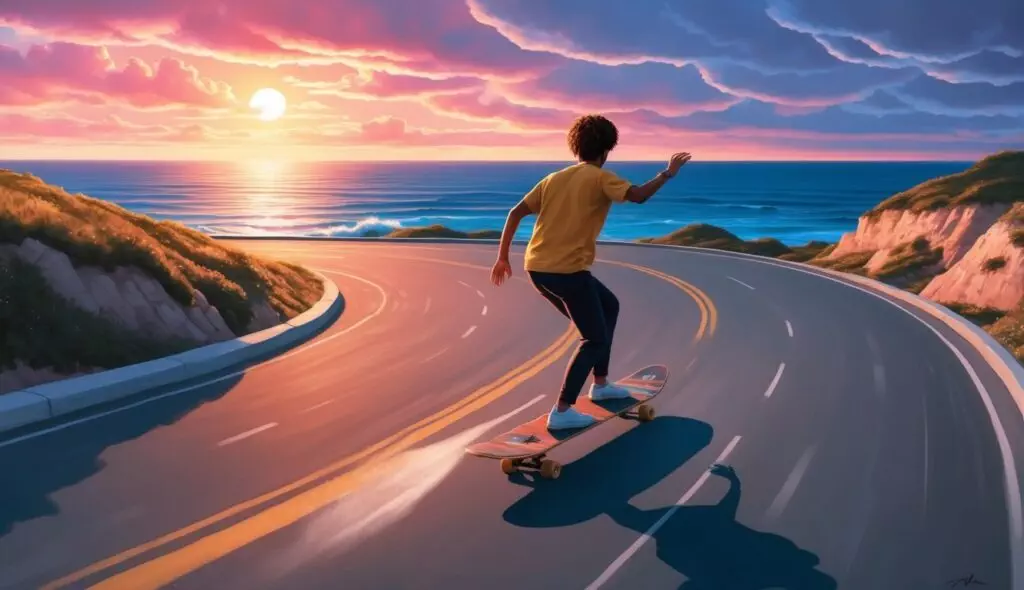
One of the most impressive sights for skateboarding is watching a longboard rider carve down a hill. The back and forth curves the rider makes drifting down the hill seem effortless.
Sometimes it seems like the skateboard is performing an endless curve because of the fluid carving motion. The longboard rider on his board appears to be weightless at times, making the carving ability look effortless.
Appearing to be effortless and being effortless are two different things. Truthfully, longboard carving has a learning curve involved and takes some dedication and practice.
These S-curves require a skateboarder to maintain balance while riding downhill. The turns come as a result of a rider shifting their weight, which usually would cause a reaction of losing balance instead of maintaining it.
If you’re new to longboarding, learning to carve properly is probably at the top of your list of things to learn. However, before you can learn how to carve on a longboard, it helps to define what carving is.
What Is Longboard Carving?
Carving is a maneuver a longboarder uses to make broad, arc-style turns on flat ground or hills. The rider makes sweeping S-style turns from left to right, making the deck slide sideways in a carving motion and wavy shape. Why is it called carving?
Carving appeared initially in the sport of ocean surfing. Have you ever heard the term “carving a wave” used by a surfer? These turns are where this saying originated.
Snowboarders also use a carving technique when navigating mountain slopes. Instead of carving a wave, a snowboarder will refer to the movement as “carving the snow.”
When you watch a skater use a double-kick skateboard or a cruiser, heel-turns and kicks are usually used to turn the skateboard. Why is learning to carve so important for longboarders?
Learning to Carve Using a Longboard
There are four distinct styles of riding when it comes to longboarding. These four styles entail separate elements and disciplines, allowing riders to showcase their skills in different ways.
1. Cruising
Cruising on a longboard can be defined as a commute or joyride through flatland areas. Skateboarders push their way through urban sidewalks or streets, generally riding for pleasure instead of speed or for displaying tricks. Sharp turns might be involved.
2. Freeriding
Freeriding can also be called downhill longboarding. Riders navigate steep, downhill treks with two objectives in mind.
The first goal is to obtain very high speeds. This speed is either used to race other longboarders or just for the sake of an adrenaline rush.
The second goal is to perform as many slides as possible. A slide is when a longboarder achieves the act of positioning the board perpendicular to the road or surface they are navigating.
Usually, a rider will lower themselves as much as possible, sometimes hanging only inches above the pavement. The lower half of the rider’s body will remain on the board, and their upper half will extend outward, away from the board. Many riders will extend their hands and scrape the pavement surface with their palms while they ride.
3. Freestyle Riding
Freestyle riding takes the focus away from speed and places it on more technical styles of tricks. Riders perform land tricks and turning maneuvers while remaining on a flat surface.
The rider may use elements of their surroundings or urban landscapes to assist in freestyle riding. There’s no limit or rules of what a rider can use, hence the term freestyle.
4. Dancing
Dancing is a technical riding style of longboarding that allows a rider to put their best-balancing moves on display. Riders move up and down the length of the board while in motion, crossing feet in body-bending motions.
Longboarding is the only type of skateboarding that allows for this dancing style of riding. This one-of-a-kind style requires ridiculous balancing skills.
Regardless of how you’re longboarding, carving is the basis for several maneuvers performed using these styles.
Cruising requires carving to make simple turns during your commute or joyride. Navigating curves and turns are nearly impossible without knowing how to carve.
Downhill riding requires carving to avoid hitting hyper speeds and wiping out on your board. When a rider performs a slide, a carve must initiate the beginning of the slide.
Freestyle riding involves a lot of carving. Tricks that riders perform involving curbs and corners will require quick turning.
Even dancing on a longboard requires a rider to know how to carve. Many of the dance maneuvers performed will either begin with carving or end with carving.
Nearly every element of longboarding involves carving in the middle, beginning, or end. It’s obvious why carving is a mandatory benchmark for this sub-genre of skateboarding.
Now that you understand what carving is and the importance of learning it, you can prepare. There are a few preparations to make before you start practicing.
Preparing for Longboard Carving
Before doing anything, you need to ensure your safety. If you’re learning how to carve, it’s obvious you’re new to longboarding.
Every new skateboarder should utilize safety equipment until they have enough confidence in their balance and basic abilities. Once you are confident and feel comfortable on the longboard, you can go lighter on the safety equipment; however, it should never be completely ignored.
Grab these items before you choose a spot to learn how to carve.
- Get a quality helmet that protects your entire head
- It’s not a bad idea to wear elbow pads and knee pads as well
- Some longboarders wear gloves to protect their hands. Sometimes you may need to plant a hand on the ground to maintain balance when you’re sliding
Where Should I Practice Carving?
It’s a good idea to find an area with ample space and minimal traffic. When we say traffic, this means vehicle and foot traffic. In the beginning, you’ll want to avoid a large crowd of people.
Avoid practicing in crowded parks or streets known for a large volume of cars. A new longboarder who doesn’t have full control over their board could potentially cause injury to innocent bystanders.
A very quiet road with a slight downgrade is a perfect place to practice. If it’s possible, use a street that is closed to traffic altogether or a straight linear path.
How to Carve on a Longboard
Here are the initial steps for carving on a longboard.
Heel Carving and Toe Carving
If you use a regular style footing when you ride, you place your left foot forward on the longboard. When you put weight on your toes, the longboard will turn right.
Alternatively, if you place weight on your heels, the board will turn left. These are known as toeside and heelside turns, respectively.
Practice shifting your weight to turn the board on flat land. Don’t head for any hills yet; don’t even pick up much speed by pushing. Focus on using your feet to shift the board while maintaining your balance.
Using Your Weight
Now that you’re somewhat used to using your toe carving and heel carving to control the board’s direction, you can start shifting your weight. Using your weight while maintaining proper balance is the key to achieving the wave-like effect and seamless carving motion.
This portion of carving is going to take the most practice. Riders must use perfect coordination in every part of their body to turn using their weight.
Begin with a toeside turn, and naturally, your head should shift toward your target destination. Keep your eyes on the area you are turning towards.
Rotate your shoulders by shifting your front shoulder in the same direction you want to turn. At this point, your toes, head, and front shoulder should all be pointing in the same direction. This will change the direction of the wheels slightly.
This might sound foreign at first, but imagine how it would feel if you threw your body into the turn. We don’t mean throw your body and fall off the board.
After your toes, head, and front shoulder are aligned, bring your hips, knees, and ankles into the turn. This aligns your whole body, giving the majority of your frame and weight to the cause. Keep your knees bent.
Once you’ve achieved a clear motion in one direction, begin the S-style curve by switching to a heelside turn. Start shifting your weight onto the heel instead of the toe.
Follow this heelside switch by rotating your shoulders and head in the opposite direction. You’ll notice yourself drifting into a turn in the opposite direction. After you’re steady and locked in your balance, throw the rest of your body into the turn.
With the proper motion and perfect balance, you’ve completed your first S-turn. Bend your knees slightly and spread your arms a little to help maintain balance.
Spreading your arms accomplishes two goals. This movement assists in maintaining your balance, but it also opens your chest area up. Opening your chest area allows for a more fluid, natural motion of all these steps. This fluid motion is what gives caving the seamless look that we all love.
Additional Tips
Here are some additional tips and suggestions that could make carving easier for you. After hammering the basics listed above, incorporate these suggestions into your technique.
- Let your heels hang off the deck generously. It’s not a bad idea to let as much as half of your foot sit off the sides of the board. Keep the full length of your toes on the sides of the deck. Imagine your foot is placed almost exactly halfway on the board and halfway off. This helps you maintain the proper level of pressure and force on the edges of your board. The pressure and force assist in turning in the same direction you place the force on the deck.
- Dive down low or crouch when you’re in the middle of a turn. Stand straight up as you are exiting a turn. This simple addition will add energy during the turn and relieve tension during the exit. This will add acceleration and increase the pace, which increases the strength of the carve.
- Incorporating these two additions into your technique will lead to a huge accomplishment. Once you master these two steps, you will have the ability to turn without your feet ever leaving the board.
Learning to carve on a longboard can seem intimidating at first. There’s no doubt that this beautiful style of turning is very demanding and requires perfect balance.
However, the positive side of this is that the steps are not like steps at all. Rather than performing a numbered set of intricate steps, carving is done in one fluid motion.
Perfect this motion and master the ability to shift your body weight, and you’ve got it. Stick to a consistent practice routine and you’ll be able to draw beautiful curves into hills before you know it.